Overview:
In this tutorial, We'll learn how to Setup Maven in eclipse and how to create a java.Eclipse Setup:
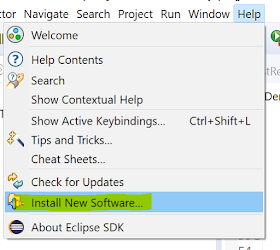
1) First Open eclipse click on Help -> Install New Software
2) Opens a dialogue box then click on "add" button, provide "Maven" in name filed and "http://download.eclipse.org/technology/m2e/releases" in Location field. Click on add.
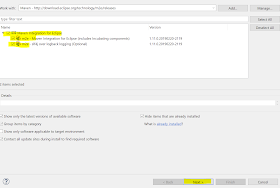
3) Select checkbox "Maven Integration for Eclipse" and click on Next.
It will check the requirements and dependencies and perform checks for installation.
4) Click on Accept and next
5) Installation will be done.
Project Creation:
Use any version of java and maven should be fine. Now we are creating a project with java 12 and Maven 3.6 version.Run the below mvn template command in terminal or command prompt.
mvn archetype:generate -DgroupId=com.java.w3scools.blog -DartifactId=Java-W3schools -DarchetypeArtifactId=maven-archetype-quickstart -DinteractiveMode=false
You may receive the error saying "The goal you specified requires a project to execute but there is no POM in this directory" - "BUILD FAILURE".
If creating maven project first time ever then it will take a few minutes to download dependencies from repository to local machine.
POM.xml:
Default a xml file is generated by maven which is named as "pom.xml".<project xmlns="http://maven.apache.org/POM/4.0.0" xmlns:xsi="http://www.w3.org/2001/XMLSchema-instance"
xsi:schemaLocation="http://maven.apache.org/POM/4.0.0 http://maven.apache.org/xsd/maven-4.0.0.xsd">
<modelVersion>4.0.0</modelVersion>
<groupId>com.java.w3scools.blog</groupId>
<artifactId>Java-W3schools</artifactId>
<version>0.0.1-SNAPSHOT</version>
<packaging>jar</packaging>
<name>Java-W3schools</name>
<url>http://maven.apache.org</url>
<properties>
<project.build.sourceEncoding>UTF-8</project.build.sourceEncoding>
</properties>
<dependencies>
<dependency>
<groupId>junit</groupId>
<artifactId>junit</artifactId>
<version>3.8.1</version>
<scope>test</scope>
</dependency>
</dependencies>
</project>
All needed libraries should be part of the pom.xml file.
If we need the code coverage jar then need to add the below as part of the pom.xml file.
<dependency>
    <groupId>org.codehaus.mojo</groupId>
    <artifactId>cobertura-maven-plugin</artifactId>
    <version>2.7</version>
    <scope>test</scope>
</dependency>
we can find all jars in mvn repository.
Life Cycle Phases:
Default phases:
validate: validate the project is correct and all essential information is availablecompile: compile the source code of the project
test: test the compiled source code using a suitable unit testing framework. These tests should not require the code be packaged or deployed
package: take the compiled code and package it in its distributable format, such as a JAR.
integration-test: process and deploy the package if necessary into an environment where integration tests can be run
verify: run any checks to verify the package is valid and meets quality criteria
install: install the package into the local repository, for use as a dependency in other projects locally
deploy: done in an integration or release environment, copies the final package to the remote repository for sharing with other developers and projects.
Additional Phases:
There are two other Maven life cycles of note beyond the default list above. They areclean: cleans up artifacts created by prior builds
site: generates site documentation for this project
Run Program:
Maven application by default provides a "hello world" program.public class App
{
public static void main( String[] args )
{
System.out.println( "Hello World!" );
}
}


No comments:
Post a Comment
Please do not add any spam links in the comments section.